The following are all pictures that I have taken myself, today actually and I plan to follow up with video but I am unaware of when that will be. I will reference any sites I believe will be helpful.
Upon entering the world of fiber arts, I must warn you I am an enabler and will not encourage you to quit but only to continue to add to everything that you have. We (knitter's, crocheter's, and the like) are also very vocal and some will tell you there is only one right way to do something, yet when you look around as many people who are participating are doing the techniques differently.
Being a believer of the lessons that Jim Henson taught us (groan if you must but those of you here from Muppet Central know exactly what I'm saying) will tell you that there is no right or wrong way to do something and I am only teaching you a foundation to build on. Refine your techniques after you understand what you are doing and are able to make it your own and become comfortable so that it is a relaxing pass time for you.
Also, if you are going to start indulging in these crafts, then you must remember that in the beginning, work will be sloppy and you will want to rip it all out (called frogging affectionately because you just rip it, rip it, rip it - if you still don't get it say that three times fast). You must pledge that you will give yourself months and years to refine technique and accept mistakes and keep moving on regardless of mistakes (I'll talk about this in another post but if you don't you'll never have anything to show and 98% of people will not notice).
Now, all that said, I'm starting you all off with crochet and I am bias in that because I learned to crochet first I believe it to be easier. (This is another idiosyncrasy in the fiber arts world, as many believe that crochet is easier as believe knitting is easier. I say it's based on what you learn to do first but what do I know...)
Crochet is different from knitting in that in crochet you use one hook to make your stitches, once you finish that stitch it is complete and you do not have to worry about loosing it if you drop the yarn (in knitting each stitch is dependent on the other just ask lace knitters).
Now, I am going to teach you crochet using American terms as that is what I'm most familiar with (we'll use another post to dedicate to the differences in terms from England after you're more familiar with what we're doing) and I am right handed. Speaking as some one who is not left handed I don't know what it is like to try to learn left handed crochet (which can be different, if you look it up things are done backwards) from a right hander but I also believe that since you use both hands that you should give it a shot this way. It just depends on how predominate you really are. In crochet it can be vastly different, knitting not so much, but I digress.
Okay, now first gather your supplies:
 You can ignore the knitting needles for now, that's for another week's lesson. If you don't have a mascot that's okay too, but Fredrick really likes to be included so I let him sit to watch as well.
Also, start with a light colored yarn smooth yarn because it is easier to see the stitches then.
The notebook is so that you can write down pertinent information such as how many chains you made for your foundation, your hook size, your yarn size, your ideas for the project, etc.
We're just going to be basic for now and start with the chain stitch for foundation and single crochet. Your practice will be to crochet a square, or many. The squares can be donated to Warm up America/Blankets for Canada or other such similar organization. There are even several taking donated squares for their own purposes. We'll cover these on another day.
So, I start with my yarn, scissors, and two crochet hooks (one larger, I'll show you why in a minute).
My yarn goes in my left hand. There are different ways to tension it but don't worry about it now, just hold it and work with it however is comfortable for you and we'll discuss different techniques at a later date. Especially since I tension differently for crochet than knitting.
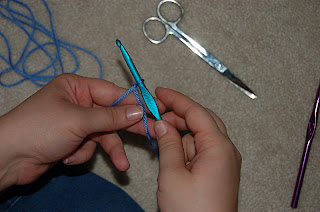
 1. Make a slip knot. I do this by wrapping the yarn around my fingers making sure to keep the tail I'm leaving secured against my fingers with my thumb:
 The second wrap goes behind the first:
 The placing my hook underneath the first wrap and grabbing the second wrap with the hook
 And pulling through (still holding the tail with my thumb)
 Slipping the first wrap off of my fingers to snug the loop against my hook. You will see that on my hooks (I'm picky and use Boye metal hooks and can't bring myself to change) after the hooked part it widens to a standard size before dimpling out for the identification of which hook it is. I use that standard size part to fully form my loop not going onto the widened part. There are other hooks that after the hook area widen for one standard size all the way down. Use what you are comfortable with. I like how my yarn moves on metal, other's swear by plastic, wood, or bone. It's all personal...
 Anyway, to continue:
2. Wrap the yarn around the hook and pull through:


 You have just made your first chain (you only count what is off of the hook, not the active loop). Continue in this manner until you have as many chains as you would like for a foundation plus 10. The extra you will be able to undo the slip knot to take out later and it will give you something to hold firmly onto as you make your second row. This makes it a little more comfortable.
I personally make my first 10 that are waste with the hook that I will use for my project and then switch to a larger hook. By doing this I know where my true foundation starts because the larger hook produces a different gauge (stitches per inch) and is larger. The second thing accomplished by this is that it produces the different gauge making it easier to start my first row of crochet and looks neater when finished. Many people find this tip makes a huge difference.
The following pictures illustrate switching from the first hook to the second:
 Make the loop larger:
 Slip in next hook:
 Pull to chain to hook:
 Continue chaining, making the number of chains you would like for the foundation row.
 In this picture you can see the difference between my stitches with the smaller hook and then the larger:
Now, you're ready to start your first row.
For single crochet take your hook and insert it in the second chain from your hook. Remember that the one on the hook does not count.
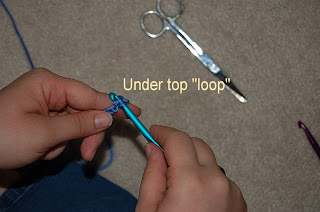
 This is what it will look like when inserted under the top loop (top portion of the chain)
 Some people will insert in the hole of the second chain that they see, some under the top loop. I vary with the type of project that I'm doing and what type of edge I want to see on my project. It doesn't matter as long as you do the same thing across the entire row.
Wrap the yarn around the hook once and pull through the chain loop only:
 You will have two loops on the hook now.
 Wrap the yarn around the hook and pull through these two loops:
 Congratulations, this is your first single crochet.
 Continue down the row until you have used up your foundation chain stitches and have reached your ten extra.
Chain two. Just as you did before.

 Turn the piece (you can take your hook out and turn the work and reinsert the hook or you can simply turn it) so that you can go across all the single crochets you have made.
 Insert your hook under the two loops that you see on top of the first stitch. The will look like a V.
Here my hook is already inserted so you can see what it is like on the hook., you can see the V I'm talking about in the second stitch.
 Wrap the yarn around the hook and pull through your V only.
You are now left with two loops as before.
 Wrap the yarn again and pull through as you did before.
 Continue the row in the same fashion.
When you get to the end you are ready to turn and do it again.
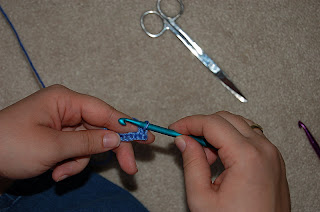
 This is after three rows. Every crocheter is different. And you are probably using different yarn and a different size hook. It may be bigger or smaller than mine. Continue until you are ready to stop.
 Make one more chain.
 Hold the crochet hook between your thumb and forefinger
 Cut your yarn leaving plenty of tail.
 Pull the loop with the crochet hook as if you were switching hooks and go ahead and pull the tail of the yarn all the way through.
 Tighten.
 And you're now finished. We will discuss hiding (weaving) in ends at another time. (It's another long tutorial) And notice how the piece is curling slightly. That's part of the nature of this stitch (you'll see this a lot in knitting too) and with crochet can straighten some the more rows that you have. there are a lot of different variables with it.
Happy crocheting to everyone and enjoy practicing your squares!
Also, until I'm able to get video of myself up, I'll post links to video elsewhere (as I said everyone has their own technique, so eventually I would like for you to be able to see my hands in motion so you understand what I do, and can compare it to other videos)
These are from Annie's Attic:
Chain stitch:
http://www.anniesattic.com/crochet/content.html?content_id=1
Single Crochet:
http://www.anniesattic.com/crochet/content.html?content_id=68
1 comment:
I know it's obvious to you, but not to me: when you wrap your yarn around the hook, which direction do you wrap? over or under? That's the part I can't get straight.
Thanks for this great tutorial.
Sue
Post a Comment